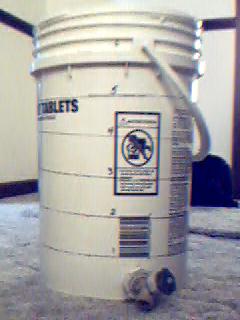
The figure above shows a water heater faucet adapted to
one of my plastic buckets. I prefer this type of faucet to the
ones with the 1/4 or 1/2 turn handle because they stand up better to
heat and are easier to inspect and clean. I also use a water hose
pressure nozzle to adapt my plastic tubing to the faucet. If you
get the type of nozzle shown here, it is tapered so it will accept a few
different diameters of tubing.
Note how I unscrewed the valve stem nut so I can see inside
the faucet and also inspect the valve stem. I never tighten this
nut more than hand tight. That way, as I wash the bucket, I turn
off the nut and flush and inspect everything to make sure it is squeaky
clean.
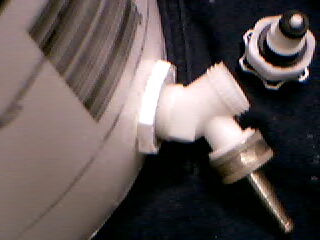
If you have a good imagination, in the image on the left, you can see the marks where the web was. They are the axial lines on the right side of the nut and near top.
Other information. If you can get the smaller diameter nut on the inside, then you can locate the hole where I do. It is an 1-1/4 inch hole centered 1-1/4 inches above the bottom lip of the bucket. My buckets have a bottom that is recessed (or is it upcessed) 3/16 inches from the bottom lip.
I seal it with food grade silicone sealant. DAP 8641.
Any questions, email me at the link below after removing the "NoSpam_":
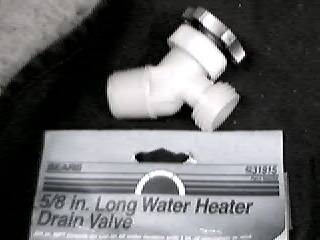
How I do it.
I start with a water heater faucet like that below.
The problem is you need a nut, actually, 2 nuts, one for
the inside and one for the outside so you can pinch the wall of the bucket
between them for a leak free fit. I used a PVC adapter that allows
a 3/4 pipe to be screwed into a 1-1/2 inch ID PVC pipe since it matches
the faucet 3/4 pipe threads. One similar to what I use is
Unfortunately, the one shown is not exactly like the ones
I actually use. I'll get to the differences later. What I
do is cut the adapter just behind the hex head with a hack saw. The
hex head part becomes the outer nut while the remainder becomes the inner
nut. Note, pipe threads are tapered. On the male thread, the start
is smaller diameter and the diameter increases as you go up the thread.
the female end is the opposite. This comes into play when you
decide which end of the prices you start on the threads first.
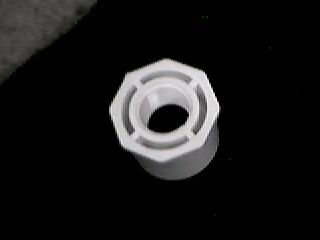
About the adapter I used verses the one in the image above. I got the original ones at Sears Hardware but the two different stores I checked didn't have them. The one in the image is from Home Depot. The other type is preferable. See the webbing connecting the inner 3/4 thread piece with the outer nut? Well in the ones I used, the nut didn't have the web, it was solid. If you flipped the adapter end for end, the other side was webbed. In this one, the inner side is solid so it is effectively 1-1/2 inches in diameter. The disadvantages of this style are:
(1) I want the inner nut to be as small in diameter as possible so I can locate the faucet as low as possible. That way a minimum amount of liquid is left behind. I cut the inner threaded part away from the outer part so it is as small as possible. I actually locate the faucet just high enough that I can inspect the area around the nut on the inside to be sure nothing collects there. I use a mirror.
(2) I prefer the nut on the outside to be solid. Since I gook it up with food grade sealant, the less open spaces, the better.
Below is an image of the inside.
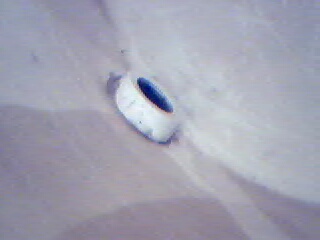
If you have a good imagination, in the image on the left, you can see the marks where the web was. They are the axial lines on the right side of the nut and near top.
Other information. If you can get the smaller diameter nut on the inside, then you can locate the hole where I do. It is an 1-1/4 inch hole centered 1-1/4 inches above the bottom lip of the bucket. My buckets have a bottom that is recessed (or is it upcessed) 3/16 inches from the bottom lip.
I seal it with food grade silicone sealant. DAP 8641.
Any questions, email me at the link below after removing the "NoSpam_":